
1. Introduction
Most heat treatments for steels begin by heating the specimen into the austenite phase field. The resulting austenite is then cooled continuously to room temperature. This is achieved by plunging the specimen into a bath of water or oil, or by removing it from the furnace to cool in air ("normalising"). If very slow cooling is required then the sample is left in the furnace which is switched off. The actual cooling rates may vary in different regions of the sample. These variations may be large since steels are relatively poor conductors of heat (thermal diffusivity of steel is about 10-5 m2 s-1, of copper about 10-4 m2 s-1).
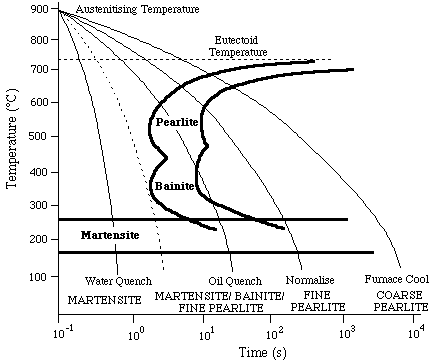
The properties of steels are sensitive to microstructure. It is useful to know how the microstructure develops in different parts of a specimen during heat treatment. For a given steel composition, a Continuous Cooling Transformation (CCT) diagram can be constructed from experimental data, allowing the microstructural development to be followed as a function of the cooling conditions. Fig.1 shows a CCT diagram for a eutectoid
(Fe-0.8 wt %C) steel. Curves are plotted for the onset and completion of reactions to form pearlite, bainite and martensite. The former two have the "C" shape because the driving force is small at high temperatures whereas diffusion becomes sluggish at low temperatures. Martensitic transformation is represented by a line parallel to the time axis, since no diffusion is involved and because of the very high rate of growth, the fraction transformed depends only on the temperature.

Figure 1. Typical CCT diagram for a eutectoid steel.
CCT diagrams are usually plotted with a linear temperature axis and a logarithmic time axis. A constant cooling rate therefore plots as having a continuously increasing gradient. In analysing real experimental results the true thermal history can be plotted even when the cooling rate is not constant.
The dotted cooling line represents critical cooling conditions. Cooling faster than this avoids all transformations other than martensite. Since this will normally produce a specimen having the highest hardness, the critical cooling rate is a measure of the hardenability of the steel. The hardness generally decreases with decreasing cooling rate, even for microstructures without martensite.
A steel with a high hardenability is one which has a low critical cooling rate, so that even slow cooling will lead to a martensitic structure. This has the advantage that hard material can be generated without the risk of "quench cracking" due to high thermal gradients associated with rapid cooling. On the other hand, it means that hard (and brittle) material may inadvertently be produced in finished artefacts, notably as a result of welding operations.
2. The Jominy End Quench Test
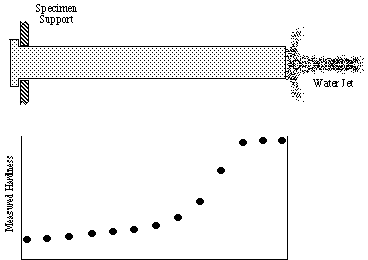
The hardenability is measured by quenching one end of a hot bar (Fig.2). The bar is heated to the austenitising temperature, placed on a support and directionally cooled with a water jet. When cold, the specimen is sectioned and hardness measurements are made at intervals along its length. A wide variety of cooling rates and corresponding hardness data are revealed in a single and spectacular test.
The hardenability may be represented by the critical cooling rate, or the critical distance along the bar at which the hardness (martensite content) starts to drop. It is useful to examine the microstructure and correlate it with the hardness as a function of position along the Jominy bar.

Figure 2. Jominy end-quench specimen and corresponding hardness plot
3. Factors affecting Hardenability
The alloying elements in steel have a big influence on hardenability. This is particularly so for diffusional transformations such as ferrite and pearlite, where the solutes not only influence the thermodynamic stability of the austenite but can slow the reactions by diffusion since their solubility in ferrite will be different from that in austenite. Displacive transformations such as bainite and martensite are less affected. Elements (Mn, Ni, C) which retard the transformation of austenite and hence shift the ‘C’ curves to longer times and vice versa (Co, Al).
Hardenability is also affected by the austenite grain size. A finer grain size gives a larger number density of heterogeneous nucleation sites and hence reduces hardenability.
4. Tempering and Secondary Hardening
Martensite in steel can be hard but brittle because of its excessive carbon content. Tempering involves a heat treatment which allows the carbon to precipitate as carbides (e.g. cementite). This, and the annealing of defects, causes the martensite to become softer but tougher. If the tempering temperature is sufficiently high (500 ° C) then substitutional elements such as Mo and Cr become mobile. Fine carbides such as Mo2C then precipitate at the expense of cementite and lead to secondary hardening.
5. Experimental Procedure
The compositions of the steels studied are given in Table 1. Two sets of specimens with these compositions have already been quenched. One of these sets was tempered after quenching (Table II). There are therefore, six sections available for hardness tests along the length of the bars.
|
Specimen |
Composition (wt %) |
|||||||||
|
Code |
C |
Mn |
Mo |
Ni |
Cr |
|||||
|
S1 |
0.31 |
- |
- |
- |
- |
|||||
|
S2 |
0.33 |
1.5 |
0.25 |
- |
- |
|||||
|
S3 |
0.31 |
- |
0.5 |
3.3 |
0.8 |
|||||
Table I. Compositions of the three steels used for Jominy end quench testing.
|
Treatment |
Times and Temperatures |
|||||
|
Code |
Austenitising |
Quenching |
Ageing |
|||
|
O |
1 hour @ 900°C |
End Quenched |
- |
|||
|
X |
1 hour @ 900°C |
End Quenched |
30 mins. @ 650°C |
|||
Table II. Heat treatments applied to the three steels used for Jominy end quench testing.
5.2 Operations
<5.2.1 The Jominy End Quench Test
Do this test on any specimen, with the assistance of a demonstrator.
5.2.2 Vickers Hardness Measurement
Measure hardness along the length of two Jominy specimens from the same alloy, one in the quenched (O) and the other in the quenched and tempered (X) condition . Results should be shared with other groups to compile hardness profiles for each of the specimens S1, S2 and S3.
5.2.3 Hardenability Assessment
For S1(O), S2(O) and S3(O), establish the critical distance along the bar at which the hardness starts to fall below that of the fully martensitic structure. For low hardenability steels martensite is produced in a thin layer near the quenched surface. Rank the specimens in order of hardenability.
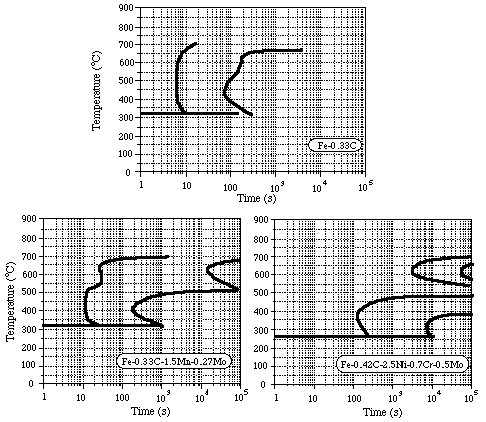
For S1(O), S2(O) and S3(O), estimate the critical cooling rates using a simple analysis of the heat flow during quenching (see practical AP1). Assume that the specimen is initially at 900°C and that the quench instantaneously brings one end to a temperature of 50°C. The error function solution then allows the complete thermal history of the bar to be predicted. (thermal diffusivity 10-5 m2 s-1.) The transformation diagram for each steel is provided in Fig.4. For the distance from the quenched end of the bar found experimentally to be the limit of martensite formation, plot on the transformation diagram the predicted (error function) thermal history and see whether this does indeed just miss the nose of the diffusional transformation curve. Calculate the (constant) cooling rate which would also give a curve passing through this point. Comment on any discrepancies.
5.2.4 Metallographic Examination
Examine the microstructures of the mounted specimen S2(O) at several positions along the length of the bar. Many of the important features of steel microstructures are impossible to see using optical microscopy. You will not, for example, be able to see the carbides that form on tempering martensite. Transmission or scanning electron microscopy has to be used. Examples of such micrographs have been provided. Correlate these observations with the measured hardness profiles. Repeat for specimen S2(X). Explain your observations.

Figure 4. Transformation diagrams for 3 steels having
similar compositions to specimens S1-S3
References
1. R.W.K Honeycombe and H.K.D.H. Bhadeshia, "Steels", 2nd edition,
Edward Arnold (1995) [De88]
2. D.A. Porter & K.E. Easterling, "Phase Transformations in Metals & Alloys",
Chapters 5 and 6, Van Nostrand Rheinhold, (1981) [Ln30]
3. R.E. Reed-Hill, "Physical Metallurgical Principles", Chapter 18,
Van Nostrand Rheinhold, (1973) [A108]
H. Bhadeshia, Michaelmas Term 2000