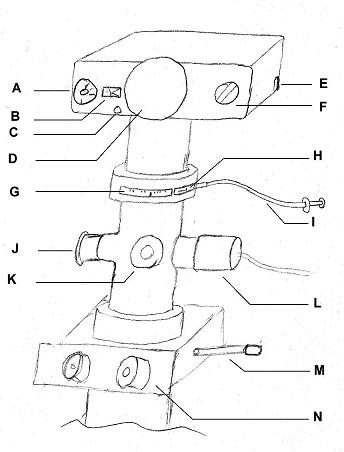
A ASA Dial
B Exposure Number
C Advance Button
D Advance Roller
E Camera Back Release
F Rewind Knob
G Exposure Ring
H Cocking Lever
I Cable Release
J Path Selector
K Sighting Eyepiece
L Exposure Sensor
M Path Selector
N Main Eyepieces

The camera takes 35 mm film, available from stores or from a class technician. Refer to the figure below for notation.
Open the back of the camera by pulling back release lever [E]
Pull out rewind knob [F]
Insert film into camera and push the rewind knob back in
Draw film leader across to the take-up spindle and push end into slot in spindle
Wind on the film a couple of times using the
advance roller [D] and advance button [C] to make sure the film has
taken on the spindle
(the advance roller will move the film on
one exposure, use the advance button to release lock and wind on
further)
Close camera back
Wind on film a couple more exposures to reveal unexposed film inside the camera
Pull out small lever from the rewind knob
Press the small button on the back of the camera
Turn the lever on the rewind knob clockwise until no resistance is felt
Open the back of the camera
Pull out rewind knob
Remove film from camera
Close camera back
Turn on by turning meter knob [B] to the HIGH position
Set ASA speed knob [C] to the film speed (or closest value)
Read value from meter
These are a set of plungers which use prisms to direct light from the source. There are two on the microscope, one by the exposure sensor [J] and one by the eyepieces [M]. Each has three settings which control the path of light.
V View Sends light to the sighting eyepiece
CV Camera/View Sends light to the sighting eyepiece and the camera
E Exposure Sends light to the exposure meter
V View Sends light to the eyepieces
CV Camera/View Sends light to the eyepieces and the camera
C Camera Sends light to the camera
The exposure ring [G] is a shutter which allows light from the microscope to hit the film in the camera. The amount of time the light is allowed to pass through it is selected using the dial at the from of the ring. To use the exposure ring:
Set the exposure time on the dial
Cock the shutter by pushing back the cocking lever [H]
Take the exposure by pressing the cable release plunger [I]
Insert film into camera
With path selector [M] on V, use the microscope to find an area on your sample you wish to photograph
Pull out path selector [M] to position C
Set path selector [J] to V
Sight up the final framing of the photograph using the reticule sights in the eyepiece
Set path selector [J] to E
Look at the meter reading on the exposure meter
Adjust the power from the light box until the meter reads a round number (eg 30. 60 etc.)
Dial the meter number on the exposure ring
Set path selector [J] to CV
Cock and fire the exposure
Press the advance button [C] and wind on to the next exposure using the advance roller [D]
Return path selector [M] to V
Always make a note of what each exposure is,
including the magnification.
Graticules are available from the class
technician
Use the two apertures on the light box to adjust the amount of light coming in. The aperture marked F adjusts the width of the light source entering the microscope, adjust this to allow just enough light to enter. The aperture marked A will adjust the contrast of the image.
The Camera
|
|
A ASA Dial B Exposure Number C Advance Button D Advance Roller E Camera Back Release F Rewind Knob G Exposure Ring H Cocking Lever I Cable Release J Path Selector K Sighting Eyepiece L Exposure Sensor M Path Selector N Main Eyepieces |
| PT Group Home | Materials Algorithms |

|

|