Proper use of hacksaw. Notice that the teeth are assymetrical so the cutting force need only be applied in the forward stroke.

An introduction to sample preparation for metallography.
A properly prepared metallographic sample can be aesthetically pleasing as well as revealing from a scientific point of view. The purpose of this practical is to understand how to prepare and interpret metallographic samples systematically. The process is illustrated below, some of the elements of which will be discussed in detail in the text that follows.
You are provided with three samples: commercially pure copper, a 60Cu-40Zn wt.% brass and a grey cast iron (Fe-4C-2Si wt.%). The copper and brass samples are in the form of rods which have been drawn and then annealed to remove the effects of deformation. The cast iron specimen will be provided to you in a hot-mounted but unprepared condition. The copper and brass specimens have to be cut and then hot and cold mounted respectively. You can begin the work with any one of these samples.
This can be done using a hacksaw which is made of secondary-hardened tool steel. A hacksaw has assymetrical teeth so that the cutting force needs only to be applied during the forward stroke. The reverse force is only needed to restore the hacksaw into its initial position. It is good practice to ensure that the blade has been mounted with the teeth pointing as illustrated. Each stroke should make use of the full length of the blade rather than just the central sector.

Proper use of hacksaw. Notice that the teeth are assymetrical so the cutting force need only be applied in the forward stroke. |
Although the blade is significantly flexible, it is very hard and can fracture violently if the direction of the stroke deviates much from the plane of the cut. You should therefore wear goggles during the cutting operation.
To use the hacksaw the sample must be secured in a vice; obviously, the plane of the cut must contain the direction of the gripping force. Otherwise you will be gripping the hacksaw whilst trying to cut! The cutting force should be reduced towards the end of the cut in order to avoid the sudden breakthrough of the blade.
Small samples can be difficult to hold safely during grinding and polishing operations, and their shape may not be suitable for observation on a flat surface. They are therefore mounted inside a polymer block This can be done cold using two components which are liquid to start with but which set solid shortly after mixing. Cold mounting requires very simple equipment consisting of a cylindrical ring which serves as a mould and a flat piece of glass which serves as the base of the mould. The sample is placed on the glass within the cylinder and the mixture poured in and allowed to set Cold mounting takes about 40 minutes to complete.
In hot-mounting the sample is surrounded by an organic polymeric powder which melts under the influence of heat (about 200 oC). Pressure is also applied by a piston, ensuring a high quality mould free of porosity and with intimate contact between the sample and the polymer. This is not the case with cold mounting where the lack of proper contact and the presence of porosity can cause problems such as the entrappment and seepage of etchant during the final stages of preparation. Consequently, hot-mounting should be the preferred way of encapsulating specimens assuming that time and resources permit, and assuming that the heat involved in the process does not influence the sample We shall use both techniques for this exercise.
The polymer mounts usually have burred edges which make it difficult to place them flat on a microscope base. These edges should be gently ground on the silicon carbide grinders.
Samples with different chemical compositions should be mounted in separate mounts or if possible, should be mounted far from each other so that they can be etched separately. Etching otherwise becomes difficult since electrochemical cells are set up between the variety of alloys. More noble alloys will not etch whereas the less noble alloys will undergo excessive etching.
Grinding is done using rotating discs covered with silicon carbide paper and water. There are a number of grades of paper, with 180, 240, 400, 1200, grains of silicon carbide per square inch. 180 grade therefore represents the coarsest particles and this is the grade to begin the grinding operation. Always use light pressure applied at the centre of the sample. Continue grinding until all the blemishes have been removed, the sample surface is flat, and all the scratches are in a single orientation. Wash the sample in water and move to the next grade, orienting the scratches from the previous grade normal to the rotation direction. This makes it easy to see when the coarser scratches have all been removed. After the final grinding operation on 1200 paper, wash the sample in water followed by alcohol and dry it before moving to the polishers.
The polishers consist of rotating discs covered with soft cloth impregnated with diamond particles (6 and 1 micron size) and an oily lubricant. Begin with the 6 micron grade and continue polishing until the grinding scratches have been removed. It is of vital importance that the sample is thoroughly cleaned using soapy water, followed by alcohol, and dried before moving onto the final 1 micron stage.Any contamination of the 1 micron polishing disc will make it impossible to achieve a satisfactory polish.
The purpose of etching is two-fold. Grinding and polishing operations produce a highly deformed, thin layer on the surface which is removed chemically during etching. Secondly, the etchant attacks the surface with preference for those sites with the highest energy, leading to surface relief which allows different crystal orientations, grain boundaries, precipitates, phases and defects to be distinguished in reflected light microscopy. There are many tried and tested etchants available but there are mandatory safety issues associated with the preparation and use of all of these. Consequently, you are limited to using just three pre-prepared solutions (Table). Please adhere to the general safety regulations provided to you at the beginning of the academic year.
|
2% Nital |
Ferric Chloride |
Sodium Hydroxide |
|
Steel |
Stainless steel |
Aluminium & alloys |
|
- |
Copper & alloys |
Zinc & alloys |
A polished sample is etched using a cotton tip dipped in the etchant. Etching should always be done in stages, beginning with light attack, an examination in the microscope and further etching only if required. If you overetch a sample on the first go then the polishing procedure will have to be repeated.
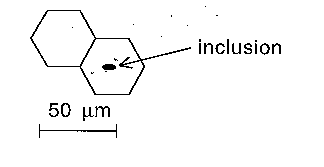
Sketch the essential features of the microstructures and identify the magnification using a micron marker. A micron marker gives an immediate indication of scale and is how you should indicate magnification. Thus, a distance of 50 microns on the sample will appear as 2.5 cm on your sketch if the magnification is x250. The micron marker is then a line 2.5 cm long with the legend 50 microns written above it (figure).

Micron marker to indicate scale, and annotation to highlight inclusion. |
Use the Cu-Zn and Fe-C phase diagrams to assess the microstructures that you observe. Discuss the metallurgical significance of any features that you think are important, for example,

|

|

|

|

|

|

|
|
|
|
|
|
| Coalesced | Foam | TWIP | FSW | 3D |
| Texture | Properties | Silicon | Synchrotron | Models |
| Neural Networks | Creep | Mechanicallly Alloyed | Theses | Retained Austenite |
| PT Group Home | Materials Algorithms |